
Learn the Deadlift
Strength training has been gaining popularity in the climbing community over the last few years and it seems like we all agree that spending some time strength training is good for our climbing.
If strength training is new for you, I’d like to help you learn! The conventional deadlift is the perfect introduction!
If you’ve been strength training already, I’d like to help refine your deadlift technique so you can hit some bigger numbers in training and get stronger!
In this post, I will outline 5 easy steps that will help learn or improve your deadlift.
If you want to develop your posterior chain, strengthen your core and build foundational strength that will change your climbing, read on!
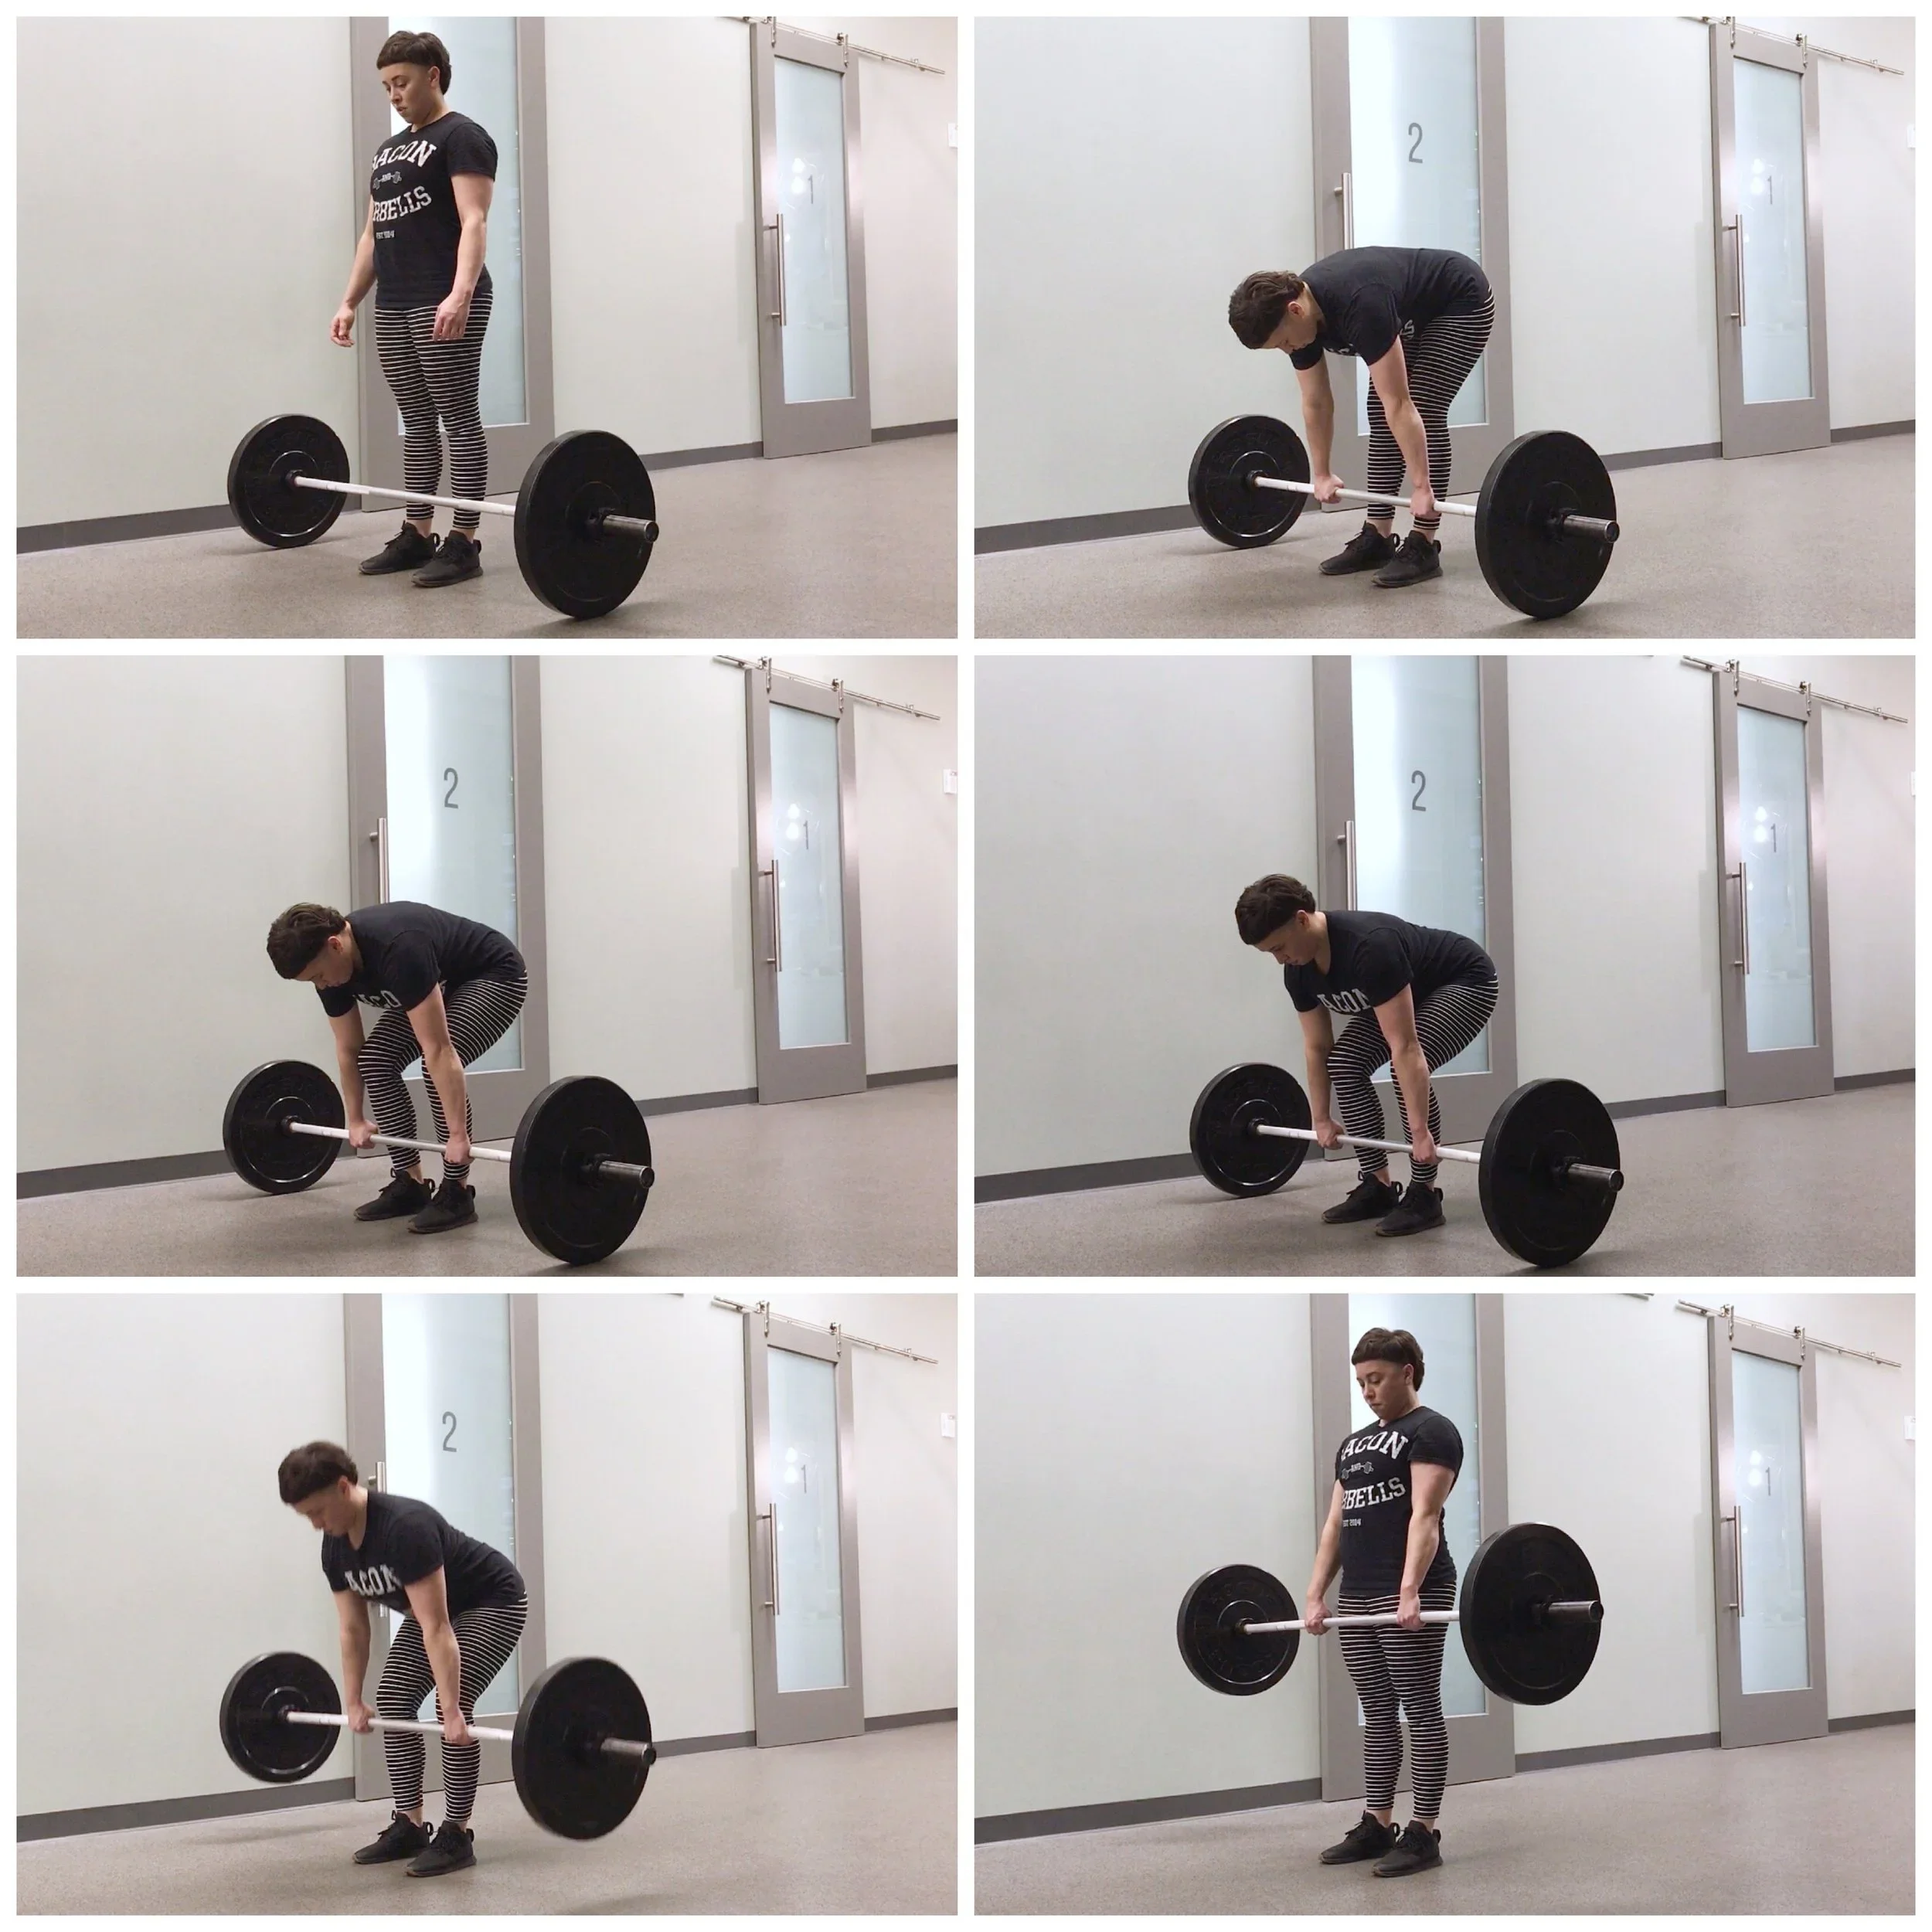
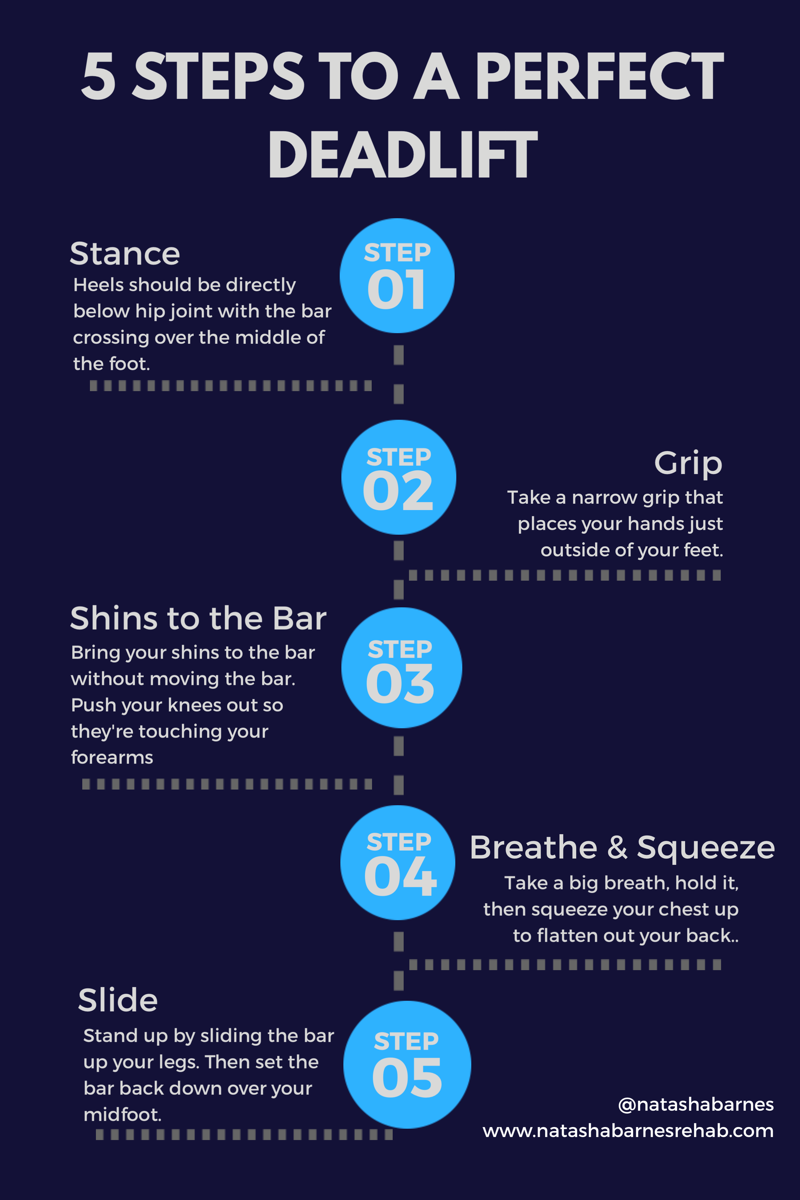
Unlike the other barbell movements, there’s a formula that can be applied when performing a deadlift. I’ll break it up into 5 simple steps that will help you get into a safe and efficient position.
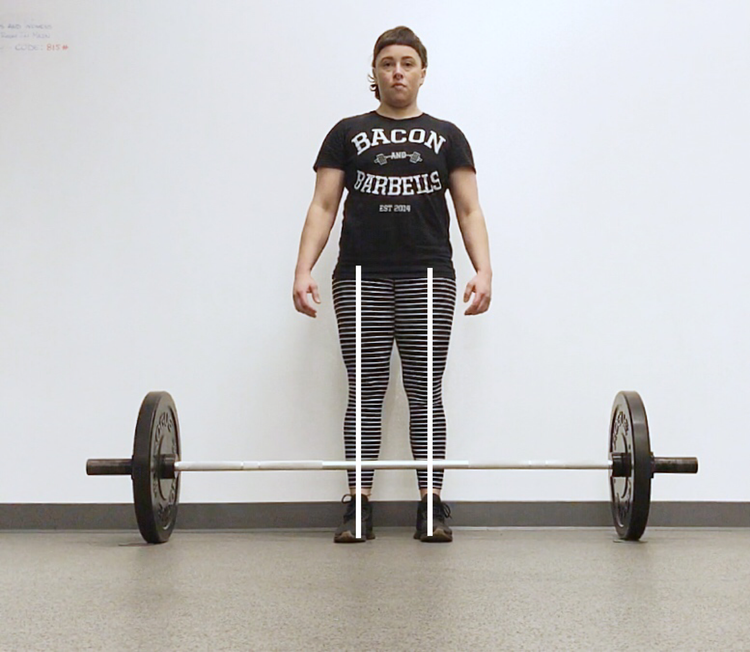
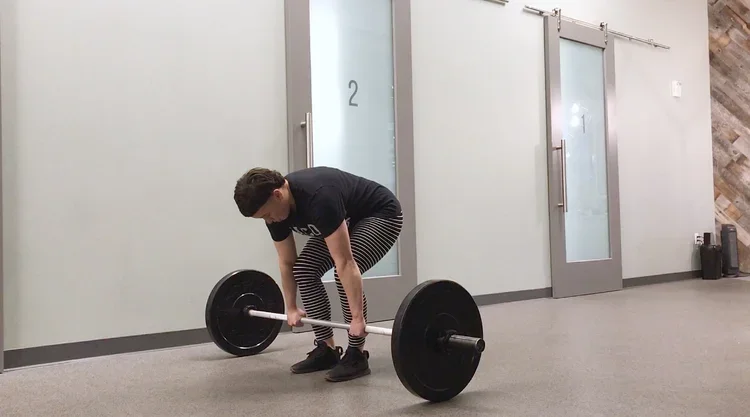
STEP 1: The Stance
Take a stance width that places your heels directly under your hips
Your toes should be turned out about 15 degrees
Shins 1” to 1 ½” away from the bar with the bar crossing over the middle of your foot
The stance you want to take for the deadlift is narrower than most people realize. If you’re in the right stance your heels will generally be no more than 8-12” apart (depending on how big of a person you are).
You should step up to the bar so that the bar crosses directly over the middle of your foot. This will help keep the weight balanced over the middle of the foot as you pick the weight up.
If you’re in the right place relative to the bar your shins should be ~1 to 1 ½ inches away from the bar.
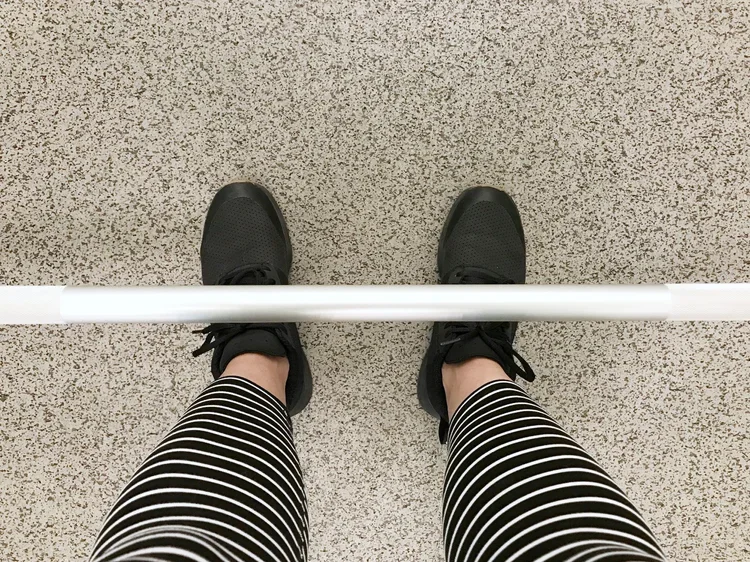
Mid-foot
You should be balanced in the middle of your foot. Not in your toes, not in your heels. This allows the most surface area of your foot to be in solid contact with the ground and which will help you stay balanced better when you are picking up heavy weight.
The middle of the foot is the balance point which takes the most force to disrupt in either direction, forward or backward. Lifting up a heavy bar when you’re not balanced in your mid-foot is inefficient and will cause you to work harder than you need to in order to stabilize yourself and the bar while deadlifting.
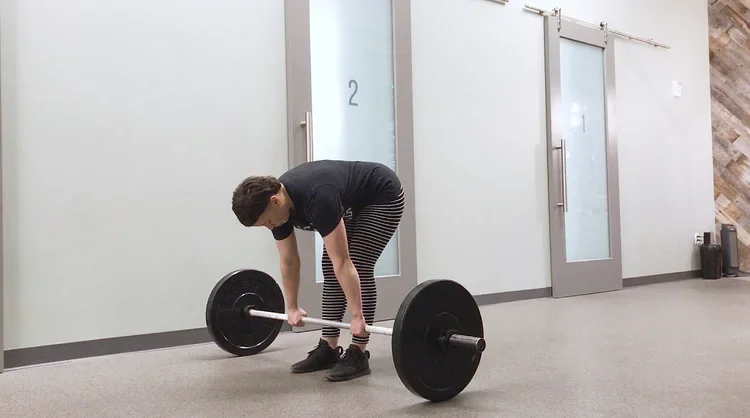
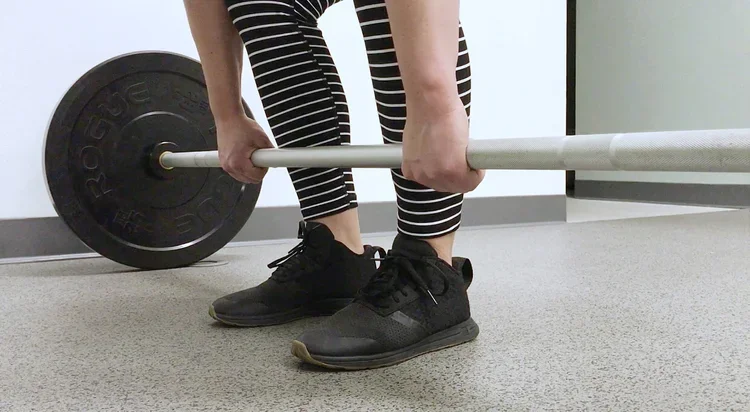
STEP 2: The Grip
Bend over (without bending your knees, if possible) and take a grip that puts the inside edge of your hand just outside of your legs
This is usually shoulder width for most people or where their arms naturally hang
Do not let the bar move or you’ll undo step one and knock the bar out of position
You want to take a fairly narrow grip for the deadlift. The wider you grab the further down you have to bend to get to the bar and the longer the range of motion of the pull.
The reason the narrow stance is helpful is that it allows you to take a more narrow grip. This will allow the orientation of your torso to be more upright which makes the deadlift more mechanically efficient.
If your grip is the right place then from the front view your hands will be just outside of your legs. Your index finger will line if with the outside edge of your foot.
Grip types
There are a few grip options you can use for the deadlift. Here they are from least strong to strongest:
Double overhand: The most intuitive grip. Fingers around the bar with palms facing towards you.
Hook Grip: The hook grip is a double overhand grip made stronger by trapping the thumb in between the bar and the first couple fingers. This creates a hook on the bar that is supported by the index and middle fingers. It’s similar to a closed-crimp grip but with fingers over thumbs. Takes a little getting used to for the thumb skin but climbers usually have tough enough hands for this.
Mixed Grip: For the mixed grip one hand faces towards you and the other faces away. Most people turn their dominant hand away but it’s a matter of personal preference. The only draw-back to this grip is that it can feel slightly different from side to side because of the different hand and arm position.
Double overhand grip.

Mixed grip.

Mixed grip.
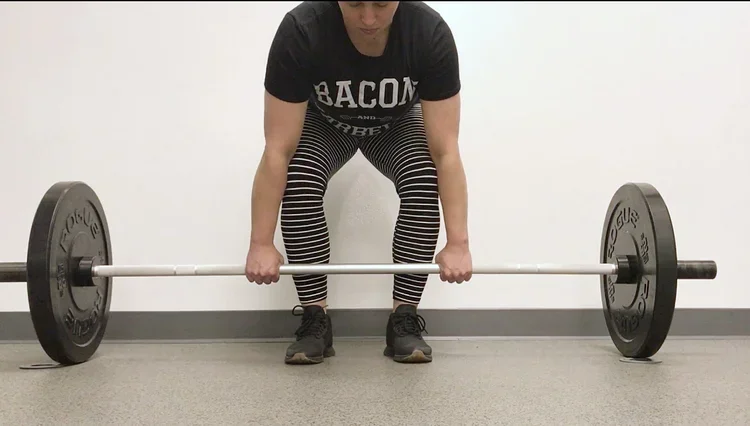
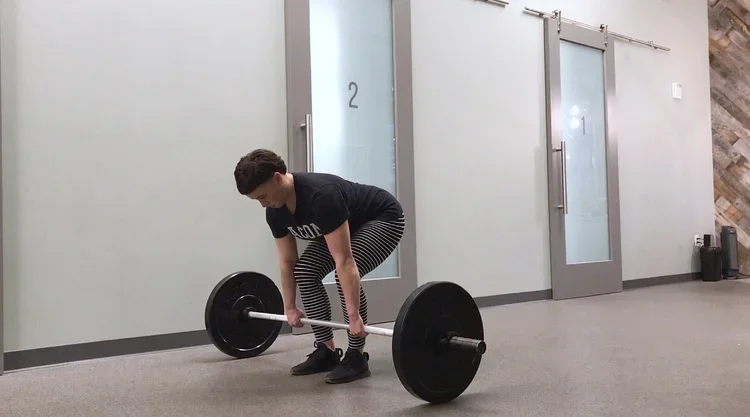
STEP 3: Shins to Bar, Knees Out
Bring your shins forward to touch the bar
Push your knees out so that your knees are pressing against your forearms
Do not let the bar move!
Your shins need to actually make contact with the bar. Keep your weight in your mid-foot. Be careful not to knock the bar forward on this step.
Shins touching the bar.
Want to know why should you push your knees out? Watch THIS. Essentially, it’s more comfortable for your stomach when you’re bent over, especially if you’re wearing a belt. It also helps you get your hips slightly closer to the bar because you’re pushing your knees out of the way.
STEP 4: BREATH AND SQUEEZE THE CHEST UP
Take a big breath and HOLD IT
Squeeze your chest up away from the bar to extend and flatten your back
Do not let your hips drop down!
Brace your abs and back to lock your position in
After you bring your shins forward to touch the bar you need to take a big breath here, hold it, then squeeze your chest up towards the ceiling to extend and flatten out your whole back.
Make sure to tense up your lats on this step as well. Your lats are what’s keeping the bar close to you when you pick it up.
When viewed from the side, your shoulders should be slightly in front of the bar and the back of your armpit should line up directly over the bar. Any other position is less than efficient.
Eye and head position
Your eyes should be on the floor about 4-5 feet in front of you and chin should be down to keep your neck from being in an overextended position.
Hip position
In step 3, when you bring your shins to the bar, that sets your hip position.
Do not let your hips drop down on this step. If you do, you’re going to knock the bar forward and end up in a squat position which is not an efficient position to pull. At a heavy enough weight, the bar WILL NOT leave the floor if you try to squat it up.
Pay attention to where you are balanced in your feet. You don’t want to have your weight shifted on your toes and you don’t want to have your weight shifted back in your heels. Instead, you want to have your weight balanced in the middle of your foot.
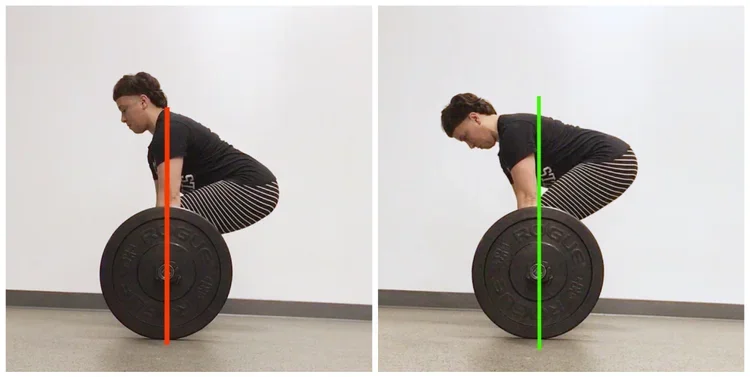
Left: Hips dropped too low, Right: Hips high, shoulders over the bar.
STEP 5: SLIDE THE BAR UP YOUR LEGS
Slide the bar up your legs
Do not let bar lose contact with your legs at any point
Stand all the way up at the top
Pick up the bar by standing and sliding the bar up your legs. The bar should maintain contact with your legs the entire time. Make sure your lats are set in step 4 so that the bar doesn’t drift away from you. Your lats are what’s keeping the bar back against your legs.
Stand all the way up and finish extending your hips. Stand tall. Don’t shrug or roll your shoulders back at the top, just stand up.
Setting the bar down
Set the bar down the same way you picked it up. You don’t need to set the bar down slowly or quietly, but don’t throw the bar down either.
You need to set the bar down under your own control. The reason for setting it down and not dropping it is so that you can be sure that you set the bar down directly over your mid-foot so that your next rep is just as efficient. If you drop it, who knows where the bar will land.
If you’re having trouble with setting the bar down WATCH THIS.
In between reps
You don’t need to let go and stand up between reps. Instead, stay with the bar and repeat steps 4 & 5 again between each rep of your deadlift. This is considered a full reset.
I don’t recommend touch-and-go reps (touching it on the floor and immediately taking the next rep) because you can cheat the reps by bouncing it off the floor and you don’t get practice building tension and squeezing the bar off the floor which is an important part of the deadlift.
Some notes on mechanical efficiency and bar path
Gravity operates perpendicular to the surface of the Earth. This means that gravity is pulling straight down into the ground against the bar.
Because of this fact, the most efficient way for you to oppose this force is by acting directly against it in the vertical plane. Therefore, a vertical bar path is the most efficient way to lift a bar.
Because you’re balanced in the middle of your foot, the bar needs to move in a vertical line over the middle of your foot for the entire lift.
That’s the deadlift! To sum it all up...
Want to read more about why your should deadlift and strength train in general? Read THIS.
It’s is covered in detail in my recent post Myths and Truths About Strength Training if you haven’t seen that yet, check it out!
VIDEO RESOURCES:
The 5 Step Deadlift from Allan Thrall of Barbell Medicine
Stop Squatting Your Deadlift from Barbell Rehab
6 Common Deadlift Errors from Allan Thrall and Austin Baraki
OTHER RESOURCES:
I learned the 5-step set up from the book Starting Strength by Mark Rippetoe.